
 |
 |
 |
 |
 |
 |
 |
 |
 |
 USING A ROCK TUMBLER
The first step in polishing rocks in a rock tumbler is to sort your stones by hardness. If you try to polish a mixture of stones with varying hardness, the harder rocks will beat the softer ones to a pulp (so to speak) before the harder rocks even begin to show a polish. Soft rocks also get scratched easily by harder rocks. The Moh's Hardness Scale comes in very useful at this point.
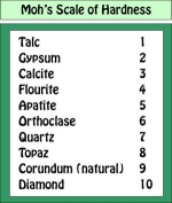
Using the Moh's Hardness Scale, you can sort your rocks easily by their hardness. All Quartz (hardness of 7) should be placed in one pile, Calcite (hardness of 3) in another pile, and so on.
Once the rocks are sorted by hardness, observe the size of the rocks you are ready to polish. Your load of rocks should all be approximately the same size. The size of each rock in your load can vary from Ẅ inch to 1 Ẅ inches in diameter. Random sized rocks that are much larger than the balance of the load will cause the tumbling process to be "out of whack".
Make sure that you have enough rock to fill the barrel of the tumbler at LEAST half full. The recommended level of rock in the barrel is 2/3 to 3/4 full.
YOU ARE NOW READY TO START TUMBLING!
Tumbling rocks to a polish is a four step process
- Rough grinding
- Medium grinding
- Fine grinding (or Pre-Polish)
- Polishing
ROUGH GRIND
Load your rocks into a clean tumbling barrel. The capacity of your barrel 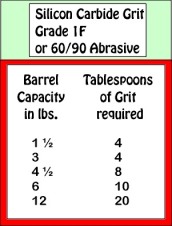 will determine the amount of grit you will need. Use the chart at the right to determine how much rough grit to use for this step.
After you have added abrasive, you may add a Ẅ teaspoon of baking soda to help prevent gas build-up in your tumbler. NOTE: Baking Soda is optional. Some tumblers do not recommend using baking soda with their equipment. Read the instructions that came with your tumbler.
Add water to the mix. Your water level should not cover the rocks completely. The water should reach the center of the top layer of the stones.
Now place the lid on the barrel and make sure it has a tight seal. Place the barrel on the tumbler and start the tumbler. I typically hang around for 10 minutes just to make sure that the seal is tight and there is no water leaking from the lid.
Let the tumbler run for a 7 days.
At the end of a week, remove the barrel from the tumbler and check a few stones. Stones are ready for the next grind if they have a "frosted" look to them when they are dry. There should be no rough edges remaining. If your rocks do not have this appearance after 7 days, place them back in the tumbler and let them grind for 3 more days.
When your stones are ready for the next step, they (and the tumbler) must be washed carefully and completely. Use a plastic colander over a 5 gallon bucket to drain them. Use an old toothbrush and water on each stone to make sure that EACH rock is free of grit before proceeding. Any rough grit that gets carried over to the medium grind will contaminate the whole load of rocks.

MEDIUM GRIND
Load your rough ground rocks to the proper level. If an acceptable level can not be achieved in rock alone, a filler must be added. Plastic tumbling pellets work well as filler as well as help to distribute the grit evenly. Plastic pellets are inexpensive and can be used several times.
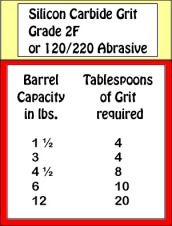 Use the chart at the left to determine how much medium grit to use in this step. As before, add water to a level that almost reached the top of the rocks (but not quite). Seal your barrel and place it on the tumbler for 7 days.
This grind will remove any remaining scratches from the rough grind. Upon completion, the rocks should be much smoother but will still have a frosty appearance when dry.
Drain and rinse the rocks using the same process as in the rough grind. Clean the rocks and barrel thoroughly. If plastic pellets were used, clean them as well and place them aside for reuse. Remember, any grit remaining on the rocks or in the barrel will contaminate the next step. Careful washing will prevent having to repeat steps later on.
FINE GRIND
Place your stones gently into the tumbler. 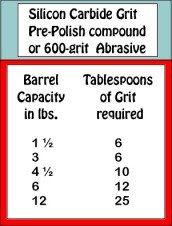 Add plastic pellets to bring your load to the proper level. Use the chart at the right to determine the proper amount of grit to be used for this step. Add water, as in all steps, to just below the surface of the top of the stones.
Place your barrel on the tumbler and let it run for 7 to 10 days. You will know your rocks are ready for polish went they have a smooth matt finish, free of any pits or scratches when dry.
POLISHING
Before you place your rocks back into the barrel for the final round, check each stone carefully. Remove any stone that may have pits, fine chips, or flaking. These stones should be placed aside to be re-tumbled in the fine grind. Stones with these defects could ruin your entire polishing batch by scratching the good stones ready for polish.
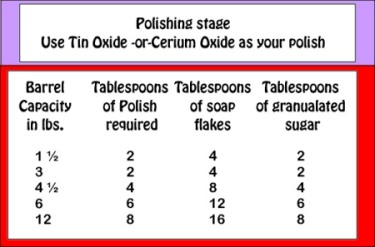
Place your good stones in the barrel. Fill your barrel to the appropriate level with plastic tumbling pellets (if necessary). This stage, you will be using a total of four (4) ingredients in order to achieve a high polish on your rocks. I use Tin Oxide, Snow White Soap Flakes, Granulated Sugar, and Water. Use the following table to determine the quantities needed for each ingredient for your particular sized rock tumbler:
After adding your water to the above ingredients, seal the lid and place the barrel on the tumbler. Let the tumbler run for 4 to 7 days (checking their progress occasionally).
When finished (after thoroughly cleaning your stones), they should look the same whether they are WET OR DRY!